 Here’s a super simple design that can work anywhere in your
home. It requires very little cutting,
painting and other know-how. I got the
inspiration for this from something on Pinterest. I saw someone make a clock using four slats
of wood, one of which was painted green.
I had no need for a clock, but I liked the idea of one piece of wood
being a nice vivid color. Choose your
own word, phrase or theme. Maybe LOVE,
FAMILY, PEACE…
I didn’t want this piece to look too rustic. I was actually fortunate enough to find a
great pallet made of oak.
 |
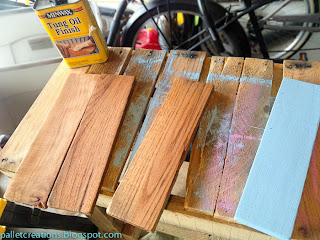
| I actually cut 5 and then narrowed it down to 4. |
Step 1- Cut four equal(ish) slats of wood. These will be your main visual pieces.
Step 2- sand them first with rough grit sandpaper, like an
80 grit. Then finish sand with something more fine, such as a 150 grit. Make sure your round the edges of the wood a
little bit to soften things up.
Step 3- Paint your contrast piece with a bright, vivid
color. I used a random color I found in
the Oops paint aisle. For the other three pieces, it may look like I stained
them, but I actually used a tongue oil on them. See this page about usingtongue oil. I figured that the oak would be great left in it’s natural shade
and I wanted to showcase the wood. If
you have standard pine or douglas fir, then you may want to stain it to get
some more color.
Step 4- I didn’t want to polyurethane the wood because I wanted it a tad more natural looking. One of my favorite finishes is paste wax. Check out this page on how paste wax can add a subtle sheen with very little effort. Note, that the wood has been painted and sealed before I put it together. This allows the finish to creep around the cracks and edges.
Step 5- Cut two small pieces of wood to run vertically along the back of the others to connect them. They don’t need to run edge to edge. Lastly, just use small finishing nails or screws to adhere the wood. Just make sure the nail or screw does not stick out the front of the wood! Measure depth first.
 |
| I used a nail gun, but you can hammer or screw it instead. |


No comments:
Post a Comment